

Den senaste veckan har varit konstig hemma hos oss och nu är vi säkra – det spökar. Små näsdukar har plötsligt fått liv och far omkring. Så här gick det till…

Ni behöver gamla, tunna näsdukar. Vi hittade våra på Myrornas för 5 kr styck. Ni behöver också en toarulle, ståltråd, tapetklister, tidningspapper, plastfolie, sax och pensel.

1. Börjar med att göra en spökställning. Toarullen kommer att fungera som kropp, ståltråden formas som armar och en boll av tidningspapper fungerar som huvud.

2. När formen är klar täcker ni den med en bit plastfolie. Näsduken ska nu täckas med tapetklister. Den ska bli helt blöt. Vill ni kan ni doppa näsduken i tapetklistret, vi har valt att använda pensel.

3. Lyft upp näsduken och lägg den försiktigt över ställningen. Om ni, som vi, pysslar vid köksbordet så tänk på att tapetklistret behöver lång tid att torka. Det är därför smart att sätta spökställningen på en täckt bricka eller något annat som lätt går att flytta.

4. När näsduken ligger på ställningen går det bra att forma till ert spöke. Vi har veckat till tyget med fingrarna, det är kladdigt men det ser så roligt ut när klistret torkat.

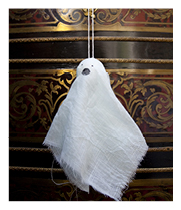
5. Låt klistret torka ordentligt. Det kan ta flera dagar beroende på hur mycket klister ni använt. Lossa sedan försiktigt tyget från ställningen. Kvar blir ett tomt tygskal, format efter spökställningen.

Plastfolien skyddar ställningen och den går därför att använda igen. Den ser lite naken och fundersam ut utan sitt tyg, eller hur. Och tyget ser väldigt likt ut ett spöke. Det går även att använda annan stärkelse. Vi valde tapetklister eftersom vi hade det hemma.

Så gick det till när spökena flyttade in hos oss. Vill ni se fler spöken? Vi har hämtat inspiration från Martha Stewards hemsida. Hon har gjort de mest fantastiska spöken, kolla här!
The past week has been weird and we are now certain – our house is haunted. Tiny handkerchiefs have suddenly come to life and are flying around. This is how it happened …
You need old, thin handkerchiefs. We found ours in a thriftshop for only a few Swedish kronor each. You also need a toilet roll, wire, wallpaper glue, a piece of newspaper, plastic foil, scissors and a paint brush.
1. First make a mold. The toilet roll will serve as body, the wire is formed as arms and a ball of newspaper serves as the head.
2. Once the mold is ready cover it with a piece of plastic foil. Now cover the handkerchief in wallpaper glue. Make sure it’s completely soaked. If you want, you can dip the handkerchief in wallpaper glue, we have chosen to use a brush.
3. Lift up the handkerchief and place it gently over the mold. If you work around the kitchen table, as we do, remember the wallpaper glue takes a long time to dry. It ‘s wise to put the mold on a covered tray or something easily to moved.
4. When the handkerchief is on the mold, it is time to shape your ghost. We choose to creased the fabric with our fingers, it’s messy but it makes the ghost look so alive when the glue dries.
5. Let the glue dry thoroughly. It may take several days depending on how much glue you’ve used. Gently loosen the fabric from the mold. What remains is an empty shell of fabric, formed after the mold.
The plastic film protects the mold and it can therefore be used again. The mold looks a bit naked and thoughtful without its fabric, doesn’t it. And the fabric looks very much like a ghost. You can also use other starches. We chose wallpaper glue because we had it at home.
That was what happened when the ghosts moved in with us. Would you like to see more ghosts? We found our inspiration from Martha Stewards website. She has done the most amazing ghosts, check it out!

10 Comments
doro K.
12 October, 2012 at 9:44 amhey, they are great! a really cool idea.
i have to make some of them and put a electric tea light under it.
I linked to your tutorial on my blog – thanks for sharing!
doro K.
dace
12 October, 2012 at 9:46 amDe är fantastiska! Ska försöka göra!
Alessandra
12 October, 2012 at 11:15 amso funny!!!
xxx Alessandra
J U L I A - fotoblogg
12 October, 2012 at 2:57 pmCoolt!
G at willowday
12 October, 2012 at 7:57 pmFun! Something to look forward to getting our for many years to come!
Annika
15 October, 2012 at 9:32 amÅh så söta!! Tack för tipset!
Linda, Fröken S
16 October, 2012 at 8:51 pmTack för tipset, tänk att hänga upp ett helt gäng sådana i verandan, i olika storlekar.
Helena, Craft and Creativity
17 October, 2012 at 10:57 pmUnderbara!
Sharon
24 October, 2013 at 8:20 amLisa is having a pajama party tomorrow – guess how I am going to keep three 5 year olds busy? Thanks as always for the inspiration 🙂
Sharon
24 October, 2013 at 8:30 amHmmm – now I just found the hanging ghousts https://pysselbolaget.se/2013/10/15/hangande-nasduksspoken-diy-handkerchief-ghosts/
I think we might have to do both because I can’t choose 🙂